This article was inspired by the Alpha WTL Sample application that I saw recently. I decided to do something similar using the MFC library. Standard MFC applications are very out of date with their 16 colored toolbars and menus without images. There are some MFC extensions that implement Office or Visual Studio like control bars. They are pretty and very powerful, but just too complicated for most simple applications. Besides, they don't obey the standard Windows UI style. My idea was to create a simple interface based on Internet Explorer that implements features introduced in Windows XP and remains compatible with all OS versions since Windows 98.
The project consists of three classes:
CMenuBar: A toolbar that looks and acts exactly like a menu bar. It can be placed in a rebar control just like in Internet Explorer. It also draws icons next to menu items.
CAlphaImageList: A replacement for CImageList that supports images with alpha channel introduced in Windows XP. It automatically generates hot and disabled images looking like in Internet Explorer 6.
CAlphaToolBar: An extension of CToolBar that allows using alpha channel images.
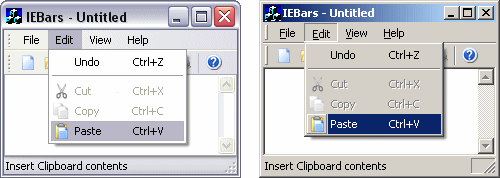
Under Windows XP this interface automatically uses either the 3D style or the new flat style (compared on the picture above). Under older OS versions it uses the traditional 3D style. Another feature introduced in Windows XP is images with alpha channel. The icons can have smoothed edges so that they look good on every background, dark or bright. This interface works correctly with images from 16 colors to 32-bit alpha channel bitmaps under all versions of Windows.
Since version 1.4, an additional class CPopupMenu is available. It can be used if you need to display popup menus without accessing the CMenuBar of the main frame. It can also be used in applications that have no menu bar at all, but need the popup menu (for example, for the tray icon). This class depends only on CAlphaImageList.
Note: The menu bar only works in SDI frame windows. It can't be used in dialog windows or in MDI frame windows.
Step 1: Add AlphaImageList.cpp, AlphaToolBar.cpp and MenuBar.cpp with their corresponding headers to your project.
Step 2: Make sure that your application uses the Windows XP visual style. Copy the manifest.xml file to the res directory of your project and add the following line to YourApp.rc2:
CREATEPROCESS_MANIFEST_RESOURCE_ID RT_MANIFEST "res/manifest.xml"Step 3: Ensure that Windows XP symbols will be included in your project. Add the following directive in the beginning of StdAfx.h or define it in your project settings:
#define _WIN32_WINNT 0x0501You will need the new Platform SDK that includes Windows XP symbols.
Step 4: Put the following in your frame window header:
protected:  // control bar embedded members
    CStatusBar    m_wndStatusBar;
    CMenuBar      m_wndMenuBar;
    CAlphaToolBar m_wndToolBar;
    CReBar        m_wndReBar;
Of course you may add any number of toolbars and dialog bars to the rebar control.
Step 5: Modify your frame window's OnCreate handler like in the example:
int CMainFrame::OnCreate(LPCREATESTRUCT lpCreateStruct)
{
    if (CFrameWnd::OnCreate(lpCreateStruct) == -1)
        return -1;

    GetMenu()->DestroyMenu();
    SetMenu(NULL);

    if (!m_wndToolBar.Create(this, AFX_IDW_TOOLBAR) ||
        !m_wndToolBar.LoadToolBar(IDR_MAINFRAME, AILS_NEW))
    {
        TRACE0("Failed to create toolbar\n");
        return -1;      // fail to create
    }

    if (!m_wndMenuBar.Create(this) ||
        !m_wndMenuBar.LoadMenuBar(IDR_MAINFRAME, AILS_NEW))
    {
        TRACE0("Failed to create menubar\n");
        return -1;      // fail to create
    }

    m_wndMenuBar.LoadToolBar(IDR_MAINFRAME);

    if (!m_wndReBar.Create(this, RBS_BANDBORDERS,
        WS_CHILD | WS_VISIBLE | WS_CLIPCHILDREN | WS_CLIPSIBLINGS | CBRS_ALIGN_TOP)
        || !m_wndReBar.AddBar(&m_wndMenuBar)
        || !m_wndReBar.AddBar(&m_wndToolBar, NULL, (CBitmap*)NULL, RBBS_BREAK))
    {
        TRACE0("Failed to create rebar\n");
        return -1;      // fail to create
    }

    if (!m_wndStatusBar.Create(this) ||
        !m_wndStatusBar.SetIndicators(indicators,
          sizeof(indicators)/sizeof(UINT)))
    {
        TRACE0("Failed to create status bar\n");
        return -1;      // fail to create
    }

    return 0;
}
Step 6: Add the following message handlers to your frame window: PreTranslateMessage, WM_MENUCHAR, WM_SYSCOMMAND, WM_ACTIVATE and WM_SETTINGCHANGE.
BOOL CMainFrame::PreTranslateMessage(MSG* pMsg)
{
    if (pMsg->message == WM_SYSKEYDOWN && pMsg->wParam == VK_MENU)
        m_wndMenuBar.SetPrefix(TRUE);
    else if (pMsg->message == WM_KEYUP && pMsg->wParam == VK_MENU)
        m_wndMenuBar.SetPrefix(FALSE);

    return CFrameWnd::PreTranslateMessage(pMsg);
}

LRESULT CMainFrame::OnMenuChar(UINT nChar, UINT nFlags, CMenu* pMenu)
{
    if (m_wndMenuBar.OpenMenu(nChar))
        return -1;

    return CFrameWnd::OnMenuChar(nChar, nFlags, pMenu);
}

void CMainFrame::OnSysCommand(UINT nID, LPARAM lParam)
{
    if (nID == SC_KEYMENU && m_wndMenuBar.OnKeyMenu(lParam))
        return;

    CFrameWnd::OnSysCommand(nID, lParam);
}

void CMainFrame::OnActivate(UINT nState, CWnd* pWndOther, BOOL bMinimized)
{
    m_wndMenuBar.Activate(nState != WA_INACTIVE);

    CFrameWnd::OnActivate(nState, pWndOther, bMinimized);
}

void CMainFrame::OnSettingChange(UINT uFlags, LPCTSTR lpszSection)
{
    m_wndMenuBar.UpdateSettings();

    CFrameWnd::OnSettingChange(uFlags, lpszSection);
}The CAlphaImageList class supports two styles of images:
AILS_OLD: The image list uses a 16 colors bitmap and doesn't create the hot and disabled images. The toolbar looks like in old style applications. The default background color (RGB 192,192,192) is used as transparent. You can change it by modifying the following line in AlphaImageList.cpp:
#define AIL_TRANSPARENT RGB(192,192,192)To avoid some gray parts of buttons (like the disk label or the printer) being treated as transparent, I modified the original bitmap so that the magenta color is replaced by a slightly lighter gray (RGB 208,208,208), which is non-transparent. You can replace the Toolbar.bmp file with Toolbar4.bmp from the resources directory of the demo project. Before that, change the toolbar button size to 16x16 pixels.
AILD_NEW: The image list uses a 32-bit bitmap if comctl32.dll version 6 is detected or a 24-bit bitmap otherwise. You can use any number of colors in the toolbar bitmap. If the bitmap contains an alpha channel and the image list is 32-bit, the alpha channel is used as transparency information. Otherwise, the gray color (RGB 192,192,192) is transparent and all other colors are opaque.
You can create 32-bit bitmaps using Adobe Photoshop or similar application. Even if the image has an alpha channel, you should use the gray color as background, so that the transparency is correct in previous OS versions - the only difference is that icon edges won't be smooth in that case.
The resources directory of the demo project contains three versions of the new style toolbar bitmap: 8-bit, 24-bit and 32-bit (with alpha channel). You can use whichever you want in your application. The bitmap was taken from the WTL sample application, with background color changed to gray. The toolbar button size should be 16x16.
Note that Visual Studio will not let you edit the toolbar if the bitmap contains more than 256 colors. In that case you will have to modify the resource file (YourApp.rc) by hand. The toolbar definition looks like this (16, 16 is the button size and IDR_MAINFRAME is the resource ID):
IDR_MAINFRAME TOOLBAR DISCARDABLE  16, 16
BEGIN
    BUTTON      ID_FILE_NEW
    BUTTON      ID_FILE_OPEN
    BUTTON      ID_FILE_SAVE
    SEPARATOR
    BUTTON      ID_EDIT_CUT
    ...
ENDCMenuBar contains the following functions to load data from resources:
BOOL LoadMenuBar(UINT nID, int nStyle=AILS_OLD)Load a menu resource. The nStyle parameter specifies the image list style (see above). You may call this function multiple times to replace the previous menu. The menu bar will automatically resize inside a rebar if needed. All images will be discarded.
BOOL LoadToolBar(UINT nID)Load images from bitmap resource and assign them to menu items with the same command IDs as in the toolbar resource. You may add multiple toolbars to a menu. You can create a separate toolbar resource that contains images for menu items, or use the default toolbar.
The menu bar assumes that the size of all images is 16x16 pixels. You can change this by editing the following lines in MenuBar.cpp:
#define MB_CX_ICON  16
#define MB_CY_ICON 16CMenuBar also provides support for displaying context menus with correct visual style and images. Put all popup menus in one resource and call the following function to load it:
BOOL LoadPopupMenu(UINT nID)This menu will automatically use the same images as the window menu. There are two functions to display popup menus:
void TrackPopup(int nIndex, CPoint ptPos)
void TrackPopup(LPCSTR lpszName, CPoint ptPos)
The first one uses menu index, the second one uses the name of the menu, which may be more comfortable if your application uses many context menus. The ptPos is the menu position in screen coordinates.
Note: If you don't load a separate popup menu, the window menu will be used by default.
You may use the new class CPopupMenu for popup menus. It has a limited functionality of CMenuBar, including LoadMenuBar, LoadToolbar and TrackPopup, but it's not derived from CToolBarCtrl and is meant to be used only for popup menus.
I found a bug in MFC 6 that caused the edit view to be incorrectly placed in the window, so that it covers a part of the rebar. The CEditView::CalcWindowRect should be replaced with CView::CalcWindowRect to fix this. Also, the edit view doesn't load and save the text correctly if comctl32.dll version 6 is used.
Implementing support for MDI applications is possible, but quite difficult. There is a lot of things that could be done, like support for chevrons, popup buttons etc. However I tried to keep this code small, simple and yet useful for most purposes.
Version 1.5 (August 3, 2004)
Version 1.4 (March 16, 2004)
Version 1.3 (September 1, 2003)
Version 1.2 (December 31, 2002)
IE-like Menu and Toolbar, version 1.5 (August 3, 2004)
Copyright (C) 2002-2003 Michal Mecinski.
You may freely use and modify this code, but don't remove this copyright note.
THERE IS NO WARRANTY OF ANY KIND, EXPRESS OR IMPLIED, FOR THIS CODE. THE AUTHOR DOES NOT TAKE THE RESPONSIBILITY FOR ANY DAMAGE RESULTING FROM THE USE OF IT.