 WebIssues Manual
Version 1.1.5
For each type of issues you can define the order of attributes, the default view and any number of public views, which are available to all users. By default, the WebIssues system installer creates predefined view settings for standard types of issues. You can change those settings for both standard and custom issue types.
Let's start with changing the view settings of the standard Bugs issue type. Go to Administration Panel and click Issue Types, then select the Bugs type and click View Settings. In case of the Desktop Client, use the Issue Types command from the main window's toolbar to open the list of issue types. The default view settings for this issue type are as follows:
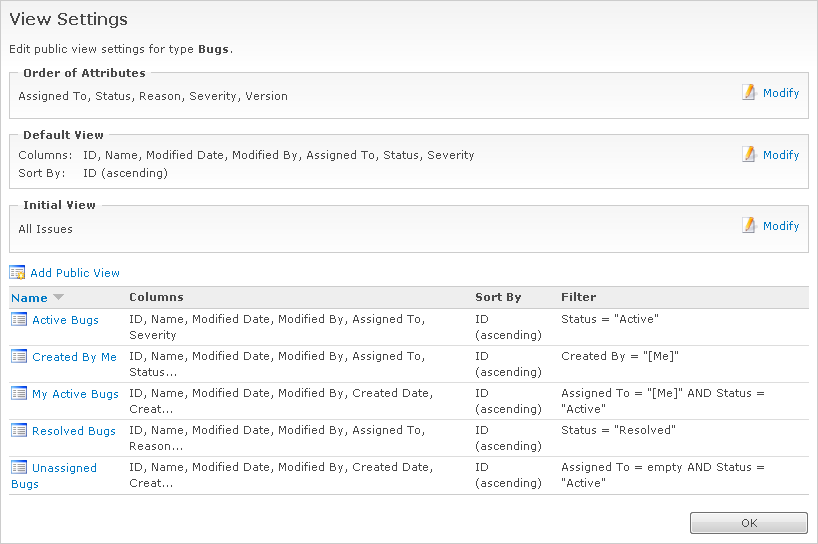
You can change the order of attributes, that will be taken into account both when displaying the details of issues, and when creating and editing issues of that type. Click Modify to change the default order:
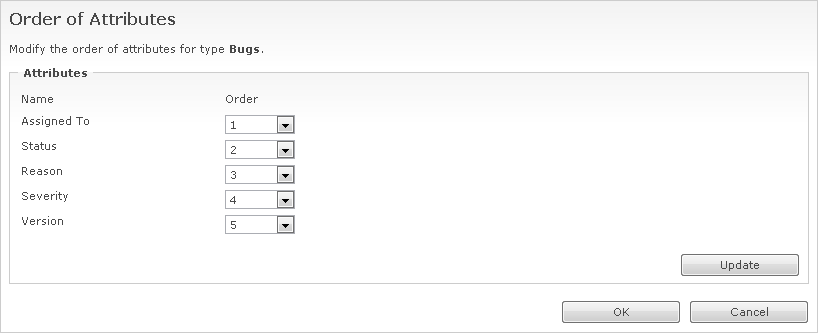
Let's assume that we want the Assigned To attribute to appear after the Status and Reason attributes. Change the value indicating the order of this attribute from 1 to 3, to move it to third position. Then click to see how the new order of attributes will look like. The Status and Reason attributes will be automatically moved to positions 1 and 2. Click to save the new order of attributes.
If you add new attributes to an issue type, they will be added to the end of the list of those attributes, whose sequence was previously defined. New attributes are by default sorted in alphabetical order.
The default view specifies the displayed columns and the default sort order for folders of that type. So this is simply the “All Issues” view, which exists for each issue type and has no filter conditions. Also all new public and personal views are based on this view. Click Modify in the Default View box to change this view:
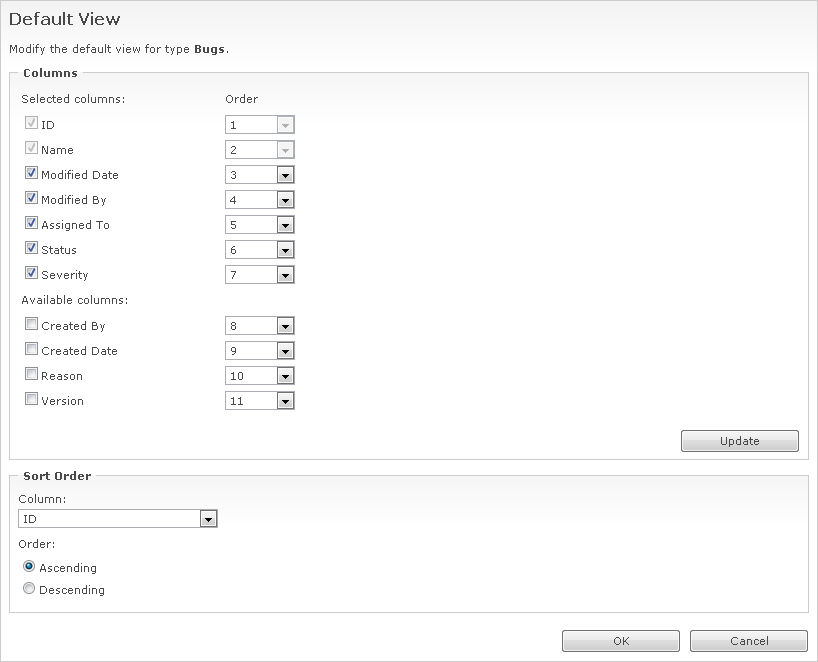
Changing the settings of the view works the same as creating personal views, as described in the section called “Filtering issues”. So you can unselect the columns you want to remove and select the columns you want to add, and change the values defining their order. For example, to add the Reason column to the default view, select the column and set its order to 7, to place it after the Status column. Click to see the new order of columns. You can also change the default sort order of issues. Finally, click to save your view.
Tip
Each view contains the ID and Name columns, which you can't delete or move. However, you can hide the ID column from all views, if you think that it's unnecessary. To do this, select the option described in the section called “Advanced settings”. The column will then be hidden from all public and private views.
The initial view is the view which is automatically selected when a folder of the given type is opened. By default it's the “All Issues” view, also known as the default view. Using the Modify option in the Initial View box you can select any public view. This way you can configure WebIssues so that, for example, only Active Bugs are displayed after opening a folder, and the All Issues view must be selected from the view drop down list in order to see other bugs.
Just like each user can define any number of personal views for each issue type, the administrator of WebIssues system can define public views for each type. Everyone can use public views, but only the administrator has the right to create and modify them.
For standard issue types, Bugs and Tasks, there are several default public views; for example, Active Bugs and Created By Me. You can change these standard views and create new ones. The Forum issue type has no views, because it has no attributes, but you can define views using the built-in columns. For example, you can create the Created By Me view, analogous to the one that exists for Bugs and Tasks. However, you cannot define the order of attributes, unless you add some attributes to this type.
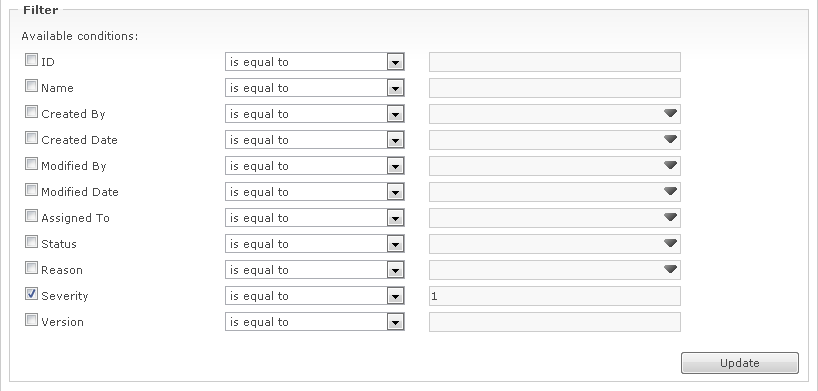
Now let's create a new view called “Critical Bugs”, similar to the personal view with the same name, which we created in the section called “Filtering issues”. Click Add Public View to create a new view. Unselect the Severity column and select the Created By and Created Date columns. To move Assigned To and Status columns to the end, set the values that determine their order to 10 and 11
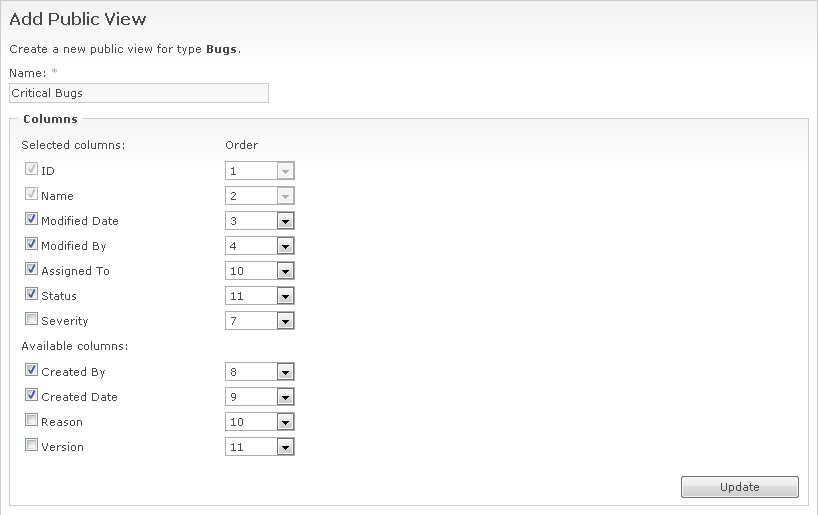
Click to see how the new column layout of the view will look. Leave the default sort order and proceed to editing the filters. Enable the filter for the Severity column and type 1 as the parameter of the condition:
Click to save changes. From now on, the new view is available to all users of the system.
Instead of creating a new public view, which is identical to an already existing personal view, you can simply publish the personal view, to make it available to everyone. Open any folder of type Bugs and click Manage Views to view the list of personal views. Then select the view you want to publish, and click Publish View. The view will disappear from the list of personal views and will be moved to the list of public views. In the same way you can change a public view into a personal view. To do this, select it from the list of public views and click Unpublish View.
To change the definition of an existing view, choose it from the list and click Change View. To rename a view, use the Rename View command. You can also delete an existing view, if it is no longer needed. To do this, select the view and click Delete View. Remember that this will remove all alerts based on this view.
You can also create a new public view based on an existing view. To do this, use the Clone View command. By default the column settings and filtering criteria of the cloned view will be displayed. Modify them and click to create a new public view. If you want to create a personal view based on an existing public view, you can use a similar function available in the main window (see the section called “Filtering issues”).