 WebIssues Manual
Version 1.1.5
The WebIssues system also has the ability to receive emails from selected email account and create issues based on these emails, as well as create comments and attachments for existing issues. Combined with email subscriptions, this allows for setting up two way email communication with the WebIssues system. It's even possible for external users, who don't have a WebIssues account, to communicate with the WebIssues system in this way, which is very useful for various support services.
Although it is possible to use email inbox without sending emails, in that case you won't be able to use automatic replies and subscriptions. Also when sending emails is not configured, WebIssues users don't have an associated email account, so all emails are treated as if they are sent by external users. For more information about configuring the outbound email server, see the section called “Email settings”. You also must ensure that the cron job is correctly configured. For more information, see the section called “Cron jobs”.
If you want the WebIssues system to receive emails, go to the Administration Panel and click Inbox Settings.
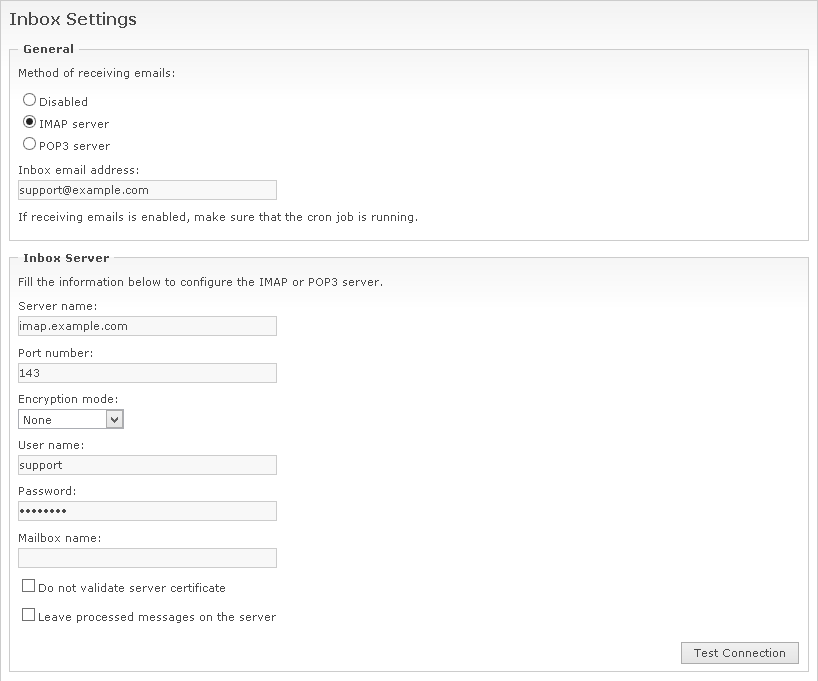
Select the protocol that will be used to communicate with the email server. It is recommended to use an IMAP server if possible, however a POP3 server is also supported. Also specify the email address of the inbox. In the Inbox Server section, enter the address of the server and the port number. Select the appropriate encryption mode if your server supports it. Also specify the user name and password used to authenticate the connection. You can specify the name of the mailbox from which messages will be processed. If you leave it empty, the current user's personal inbox will be assumed.
Note
Although the same email address can be used for sending outgoing messages and for the email inbox, it is recommended to use two separate email addresses. This reduces the risk of creating an infinite loop when a notification email is bounced by the recipient's email server, and the bounced message is processed by the email inbox.
Enable the Do not validate server certificate option if you are using an encrypted connection to a local server which uses a self-signed certificate. When using an IMAP server, you can also enable the Leave processed messages on the server. By default, WebIssues will automatically delete processed emails from the server. If you enable this option, messages will be only marked as read and they will be left on the server. In that case you need to ensure that there is some retention policy on the server which removes old emails to prevent filling the inbox. Note that this option is not available when using a POP3 server.
Click to confirm that the WebIssues can connect to the server using the specified information. It will not process any messages, only a success or error message will be displayed.
When an email is sent to the WebIssues server inbox, it is registered as a new issue in the selected folder. The subject of the message becomes the name of the issue. All attributes are set to their initial, default values. The text body of the email is automatically added as the description of the issue, along with most important message headers, including the sender and recipients. When the email has a HTML body, it is added as an attachment, which can be easily opened and viewed in the browser. Any files attached to the email are also added as attachments to the issue.
When the subject of the email contains an identifier enclosed in square brackets, for example [#123], the body of the email is added as a new comment to the issue with given identifier. The HTML body and attached files are added as attachments to the issue. Typically you can add comments to existing issues by simply responding to the confirmation message sent when the issue is created or to the subscription notification message, because they already contain the identifier of the issue in the subject. Note that you should include your comment at the beginning of the email. The body of the quoted notification message will not be included in the comment, because it is automatically cut off at the first line containing the dashes.
By default only messages sent by WebIssues users are accepted. The sender's email address is compared with the email address configured in the user's preferences. Emails sent from addresses which do not match any WebIssues users are ignored. Note that the issue is created or modified on behalf of the user associated with the email address, so that user must have access to the project and folder containing the issue. Otherwise the message is ignored and a warning is added to the Event Log.
If you enable the Accept messages from external users option, messages sent from addresses which don't have a matching WebIssues user will also be accepted. In that case you must also select the Robot user account on whose behalf such issues will be created or modified. The robot user account also must have access to the project containing the issue, unless it is a public project. By changing the permissions of the robot user account, you can control which parts of the system are accessible to external users. Although the issue appears to be created or modified by the robot user, the actual sender of the message can be seen in the headers in the beginning of the description or comment.

Tip
When messages from external users are accepted, the WebIssues server will not attempt to filter the received messages in any way. If you want to blacklist or whitelist certain addresses or filter out spam and other unwanted messages, you should configure such filtering on the email server.
For example, you can create a separate mailbox from which WebIssues receives messages, and set up a rule which only moves messages matching certain criteria to this mailbox. Refer to the documentation of your email server for more information.
In the simplest scenario, all issues are created in a single folder, which can be selected using the Default folder option. However, you can also enable the Map address extensions to project and folder option, which makes it possible to determine the project and folder where the issue is created based on the address used to send the message to the WebIssues inbox.

There are two ways to set up mapping the email address to project and folder. The first way is to enable email address extensions in the email server. For example, when the inbox address is service@example.com, an email sent to service+myproject-bugs@example.com will be registered as an issue in the “My project” project, in the “Bugs” folder. Another solution is to set up an alias, for example service-myproject-bugs@example.com, which maps to the service@example.com address. Refer to the email server's documentation for more information about setting up address extensions and aliases.
Note
In order for the folder mapping to work, the email address must contain the account name, as defined in the inbox email address, followed by a + or - character, part of the project name, a - and part of the folder name. The domain part must match the inbox email address. The address must be explicitly specified in either To or CC field of the email. Spaces and other non-alphanumeric characters in project and folder names are ignored. Only a part of the project or folder name must match, but the mapping must be unambiguous.
For example, when a project is named “My first project”, both service+first-bugs@example.com and service+firstproject-bugs@example.com will match. However, if there are more projects containing “first” in their name, the former example will not be successfully mapped, because it's ambiguous.
Be careful when using accented or non-Latin characters in project and folder names, because not all email servers will accept email addresses containing such characters. In such case you can add Latin-only words to project and folder names which can be used for mapping email addresses.
When the folder cannot be automatically determined from the email address, the issue is created in the selected default folder. However, when folder mapping is enabled, it is possible not to specify a default folder. In that case any email which cannot be successfully mapped will be ignored and a warning will be added to the Event Log. Also note that the actual user or the robot user must have access to the folder, whether it's a mapped folder or the default one.
When the Send responses when issues are created option is enabled, a confirmation message is sent back to the sender when a new issue is created through the inbox. The automatic reply contains the identifier and the name of the issue. By responding to this message, additional comments and attachments can be created, for example in order to provide more information or ask about the status of the issue.
When the Subscribe senders to created issues option is enabled, the sender of the message is automatically subscribed to the issue created through the inbox. In that case any changes made by other users, including editing attributes, modifying the description, adding comments and attachments, are automatically sent as notification emails. See the section called “Subscriptions” for more information.

By responding to the subscription notification message, when the email inbox is enabled, it is possible to add more comments and attachments to the issue. This way you can track the state of issues and add comments to it entirely by email, without having to log into the WebIssues system.
Automatic subscriptions also work for external users. This makes it possible for persons without a WebIssues account to receive notifications and interact with issues that they created. In a typical service desk scenario, when someone sends a message to the inbox account, an issue is created and the sender is automatically subscribed to the issue. When a support person modifies the issue or adds a comment using the WebIssues system, a subscription notification is automatically sent to the creator of the issue. He can then reply to the notification email in order to provide more information. This way external users can communicate with the WebIssues system using email and entire communication is tracked in the issue history.
You can also enable anonymous access to allow external users to see all issues from public projects using the Web Client, without having to log in. However, keep in mind that in that case all users will have access to all issues, not only those created by themselves. For more information about enabling anonymous access, see the section called “Access settings”.
Note that the sender is not subscribed to an existing issue when adding a comment. Also an automatic response is not sent in that case. Any other recipients of the email are not automatically subscribed to the created issue.