 WebIssues Manual
Version 1.1.5
The WebIssues system has the ability to send emails associated with alerts or subscriptions. This is optional, because the configuration of your computer or hosting service doesn't always allow this, and it's not needed in all cases. If you want to use alerts with email notifications or other features which require sending emails, you must perform two additional configuration steps.
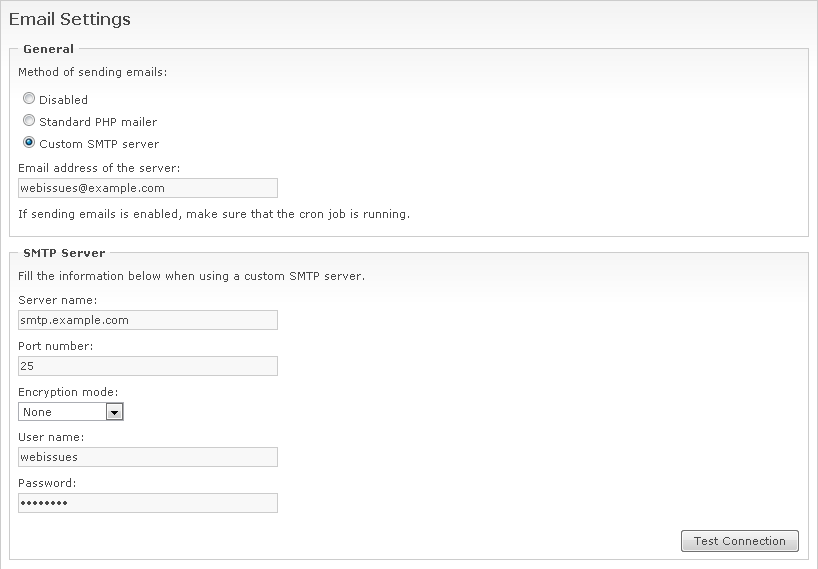
First, go to the Administration Panel and click Email Settings to configure sending emails.
If PHP on your server is configured so that it has the ability to send emails using the sendmail program or a local SMTP server, select Standard PHP mailer and enter the address from which the messages will be sent.
Note
For more information on setting up the standard mechanism for sending emails which is built into PHP, please visit http://php.net/manual/en/mail.configuration.php.
You can also send emails using an external SMTP server. You can either use your company or organization's mail server, or any public email service (e.g. gmail). Select Custom SMTP server and enter the address of the sender. In the SMTP Server section, type the address of the server and the port number of the email service (usually 25 or 587 for encrypted connections). Select the encryption mode, if the SMTP server supports encrypted communication. Also enter the user name and password required to access the SMTP server.
Click to check whether the SMTP configuration is correct. The WebIssues system will send a test message to its own address. If you receive it, it means that the configuration is correct. Don't forget to save the configuration by clicking .
Since emails are sent in HTML format, it is possible to include hyperlinks to the folder related to the notification, as well as to individual issues. To enable hyperlinks, you need to enter the base URL at which the WebIssues server is installed. The URL should include the protocol and the trailing slash, for instance http://www.example.com/. Click to automatically enter the address of the current page. Note that the URL should contain the fully qualified domain name of the server to make it available to all users. If the URL is left blank, emails will be sent without links.
The second step is to set up a recurring task which will send the notifications. This task should be executed at least once an hour, but in order to receive immediate notification more quickly, it's recommended that this task is performed at intervals of 5 to 15 minutes.
In case of Unix/Linux, you can use the cron jobs mechanism. To add a cron job, modify /etc/crontab or use a graphical tool for managing jobs. If you use Windows, open the Task Scheduler and create a new task. For more information, please visit http://wiki.mimec.org/wiki/WebIssues/Installation.
Note
Some hosting services provide the ability to define recurring tasks via shell access, or by their administration panel. Refer to the documentation of your service for more information.
If your hosting service does not offer the ability to run periodic tasks, you can install such task on another computer. For example, you can use one of the available online cron services — some of them are available for free.
If the job is executed locally, it should run the cron/job.php script using the PHP interpreter. For more information about running PHP from the command line, see http://www.php.net/manual/en/features.commandline.options.php.
If you use an external cron service or run the task from another computer, the script should be run remotely through its full URL, for example http://www.example.com/cron/job.php. To do this, you can for example use a program like wget or curl.
To check whether the cron job is being executed, go to the Administration Panel and click General Information. In the Server Configuration section, the time when the job was last run is displayed. Each execution of the job is also logged in the Event Log of the WebIssues system.
Tip
Configuring email settings and cron job doesn't mean that any notifications are actually sent. In order to configure email notifications, you must create alerts for selected folders or global lists and set the appropriate email type. Also make sure that a valid email address is entered in your user preferences. For more information about using email notifications please refer to the section called “Managing alerts”.

