 WebIssues Manual
Version 1.1.5
This chapter describes how to configure and customize the system to suit your needs. It is intended primarily for advanced administrators.
By default, the installer of WebIssues system creates several predefined types of issues, which can be used to track bugs and tasks in a typical software project, and to create discussion forums. You can modify these built-in issue types, adapting them to your needs, and create entirely new types of issues.
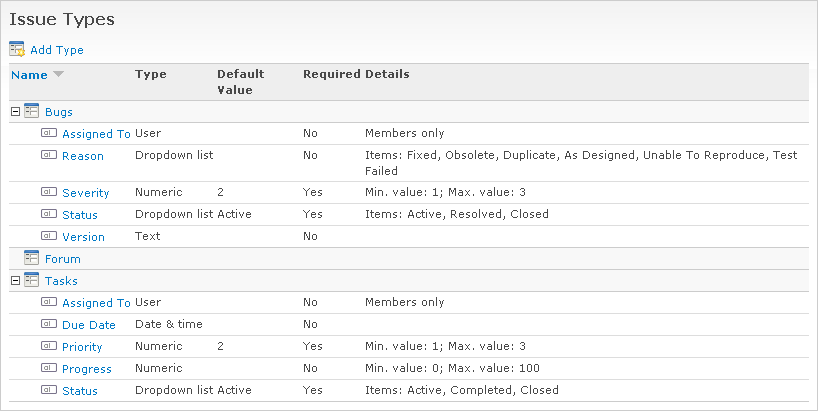
To manage the issue types, go to the Administration Panel and click Issue Types. In case of the Desktop Client, use the Issue Types command from the main window's toolbar. Below is the list of standard issue types:
For each issue type its attributes are displayed. For each attribute, its type is displayed, the default value for new issues, and also information whether the attribute is required and additional details that depend on its type.
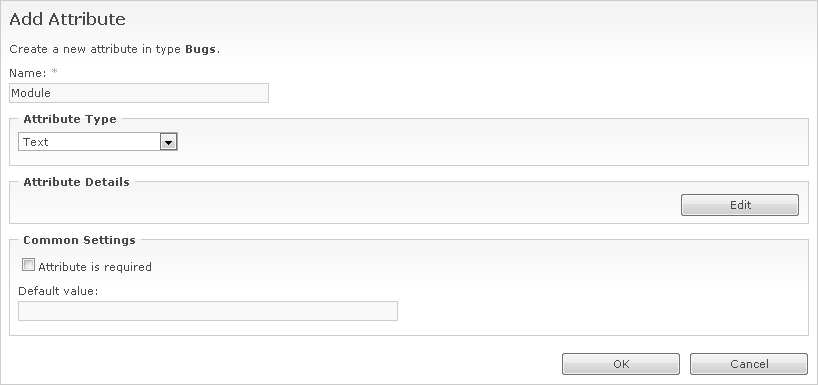
Let's start by adding a new attribute to an existing issue type. We will add the possibility of entering the name of the module to which the reported bug is related. Select the Bugs issue type and click Add Attribute. Then enter the name of the new attribute.
By default, a new attribute has the Text type, which allows entering any text. Click in the Attribute Details box to change additional attribute settings that depend on its type.
In case of a text attribute, you can select Allow entering multiple lines of text to facilitate entering longer fragments of text, which can be divided into lines. The field for editing attribute values will then become bigger. You can specify the maximum length of the entered text to limit it to a specified number of characters. Remember, however, that the attribute value can never be longer than 255 characters. To enter longer fragments of text (for example, the description of the bug) it's better to use comments. In the same way, you can also specify a minimum length of the entered text.
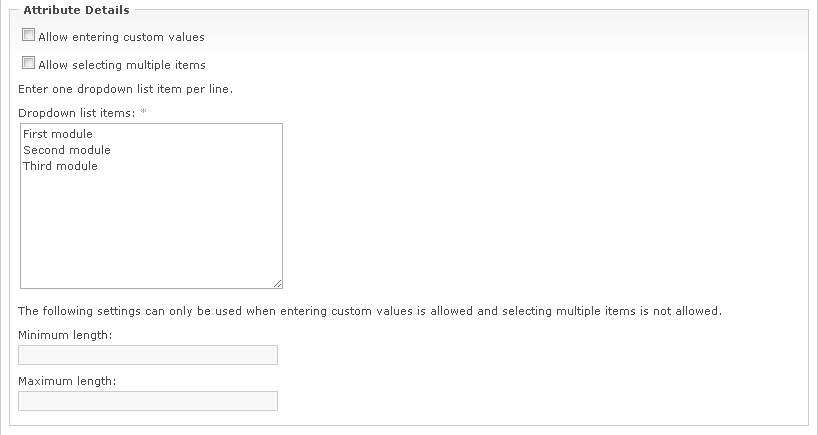
If the list of modules, to which reported bugs are related, is known in advance, then a Dropdown list can be used instead of a text attribute. Select this type in the Attribute Type field and then click to change the details of the attribute.
You must provide a list of possible values to select. To do this, enter each value, in this case the name of the module, in a separate line. By default, it's only possible to select one of the defined values. However, if you select the Allow entering custom values option, then it will be possible to enter any value of the attribute when adding or editing an issue. This way, you can type the name of a module which was not included in the list. In this case, it's also possible to define the minimum and maximum length of text, like in case of text attributes.
The Allow selecting multiple values option makes it possible to select multiple values, separated by commas. This is useful if the reported bugs may be associated with several modules at the same time. Both options can be combined; in that case it's possible to enter several values, and not necessarily selected from the list. This mode of operation, for example, allows marking issues with “tags”, which can be predefined, but can also be entered manually.
Another type of attributes is Numeric. Let's assume that you want to extend the Tasks issue type with a Level of effort attribute whose value is expressed in hours. Select the Numeric type from the list of attribute types and click .
Numeric values can be either integer, or specified with a certain number of decimal places; at most 6. You can also specify the minimum and maximum value of the attribute. For example, the Priority attribute of a Task by default accepts values from 1 to 3. You can also choose to Strip trailing decimal zeros to ignore the zeros after the decimal point; for example, the value “12.50” will then be displayed as “12.5”.
Attributes can also store a date or a date and time. For example, the Tasks issue type contains a Due Date attribute that stores the anticipated date of completion of the task. We can add a Finished attribute, which will store the actual date of completion of the task. Select the Date & time attribute type and click to specify the details of the attribute.
The value of the attribute can be a date, for example “9/5/2011”, or date and time with an accuracy of one minute, for example “9/5/2011 6:34 pm”. If you choose the Date and time without time zone conversion option, the time will always be the same, regardless of the time zone. If you choose the Date and time using local time zone, the values are stored as GMT time, and when displayed, they will be automatically converted to the local time zone. This option is useful if the server is used by people in different time zones. For more information about time zones, see the section called “Server settings”.
The last type of attributes is User. Both Bugs and Tasks include attributes named Assigned To, but you can create more attributes of this type. In case of a bug, for example, you can use separate attributes to indicate the person who reported, fixed and tested the bug.
Two options are available in the attribute settings. The Allow only members of the project option allows you to limit the list of users, who may be assigned to an issue, to those who are members of the project. This option is useful if the system has many projects and many users, and most users have access only to selected projects. The Allow selecting multiple values option makes it possible to select multiple values, separated by commas, just like in case of the dropdown list.
Regardless of the type and detailed settings, each attribute has also some common settings. If you choose the Attribute is required option, the attribute must always have a certain value. Otherwise, you can leave an empty value when creating new issues, and also clear the value for an existing issue. Required attributes are marked with an asterisk when creating or editing an issue.
In the Default value field you can specify the value of the attribute for newly created issues. When creating an issue, you can leave the default values of individual attributes, or modify them. If the attribute is required, and does not have a default value, the value must be provided when creating the issue. When specifying the default value, you can use similar special values, as in case of filter definitions. The “[Today]” value is replaced with the current date when creating the issue (with the possibility of subtracting or adding a specified number of days), while the “[Me]” value is replaced with the name of the user who creates the issue.
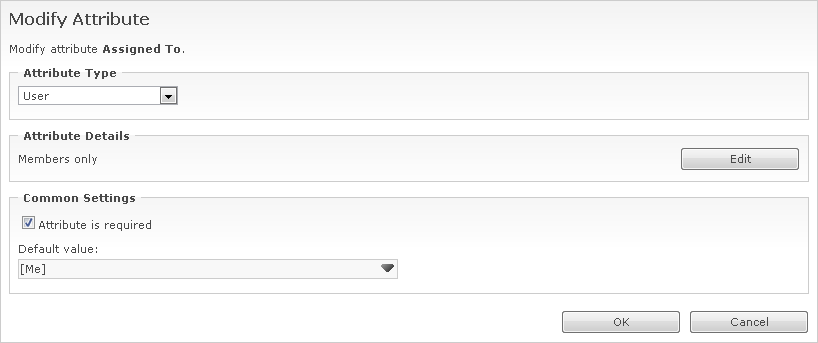
At any time you can change the definition of existing attributes. Let's assume that we want the Assigned To attribute to be required, and that bugs were assigned by default to the person who created them. Select the attribute and click Modify Attribute. Select the Attribute is required option, and in the Default Value field enter “[Me]”. Then click to confirm the changes.
Changes of definitions of existing attributes are taken into account when creating new issues and editing existing issues. They do not affect the current attribute values for existing issues. In our example, if some bugs already exist in the system, then they will remain unassigned, although the Assigned To attribute is now required. However, when editing a bug, you must assign it to someone.
Now let's suppose that we want the Severity of a bug to be specified on a scale from 1 to 5, not from 1 to 3. Select the attribute and click Modify Attribute. Then click to go to the details of the attribute. Change the Maximum value to 5 and click . Then change the default attribute value to 3 and click again to save the changes.
To a limited extent, you can also change the type of an existing attribute. For example, let's suppose that we want to define a list of choices for the Version attribute of Bugs issue type. Select the attribute and click Modify Attribute, and then from the Attribute Type list select Dropdown list. Then click to go to the attribute details and enter a list of values to select. Also select the Allow entering own values option to allow entering values which are not in the list. Click twice to confirm the changes.
The Text, Dropdown List and User attributes store the value as plain text, so they can be used interchangeably, and you can change one type to another. However, the Numeric and Date & time attributes cannot be changed to another type.
To change the name of an attribute, use the Rename Attribute command. Attribute names can be arbitrary, but must be unique within the issue type. You can also remove an existing attribute if it is no longer needed. To do this, select the attribute and click Delete Attribute.
Warning
When deleting attributes, pay particular attention whether you do not unintentionally delete the wrong data. All current and historical values of the attribute are permanently and irreversibly removed from the system and it's not possible to restore them.
In addition to modifying predefined types issues, the WebIssues system also allows creating entirely new issue types. Let's suppose that we want to create a simple calendar with events related to different people. Click Add Type to create a new type of issues.
Enter the name of the type and click . The new type has no attributes yet, so select it and click Add Attribute. Create an attribute named “Person” and select the User type. Mark the attribute as required and enter “[Me]” as the default value. Then add another attribute named “Date”, with the Date & time type, setting its default value to “[Today]”. The tree issue types, after collapsing default types, will look like this:
To be able to create issues of the new type, you must also create a folder that uses this type. You can also change the order of attributes and the default view and public views for this type. For more information, refer to the section called “View settings”.
To change the name of an issue type, use the Rename Type command. You can also remove the type of issues using the Delete Type command. If there are some folders of this type in the system, a warning will be displayed.
Warning
When deleting issue types, pay particular attention whether you do not unintentionally delete the wrong data. All folders and issues of this type are permanently and irreversibly removed from the system and it's not possible to restore them.


