 WebIssues Manual
Version 1.1.5
Over time, folders contain more and more issues and finding the desired information can become difficult. You can of course sort the list of issues using any column, not only by identifiers, but also by name or the value of any attribute. This can help you find the information you need, but it's not always enough.
The list of issues also has a quick search function. Enter a word or its fragment in the text box on the right side above the list and press , and you will see only issues which contain the text in their name. In the Desktop Client the search is performed immediately as you type, you can also press F3 to quickly activate the search box. You can also search by identifier of the issue, by the name of the user who created or modified the issue, as well as by any Text, Dropdown list or User attribute. To select the column in which you want to search, click the icon to the left of the search box and select the appropriate option. After entering the text or identifier you want to search, only the issues containing this text in the selected column or the issue with given identifier will be displayed.
Tip
To quickly find an issue with given identifier in any folder, use the Go To item command. See the section called “Comments and descriptions” for more information about identifiers of issues, comments and attachments.
In everyday work, however, it's most useful to use views. Each view has filter conditions, which limit the displayed list of issues to those that meet certain criteria. Each view also has its own column layout, and default sort order. In other words, the view defines which issues from all issues in the folder are visible, and which columns from all available columns are displayed.
What views are available depends on the type of issues in the folder. The only exception is the “All Issues” view, which exists for each issue type and has no filter conditions, and therefore (as the name implies) displays all the issues in the current folder.
Open the Bugs folder, and then expand the list of views on the left side above the list of issues. You'll see the default “All Issues” view, and a few public views:
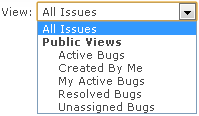
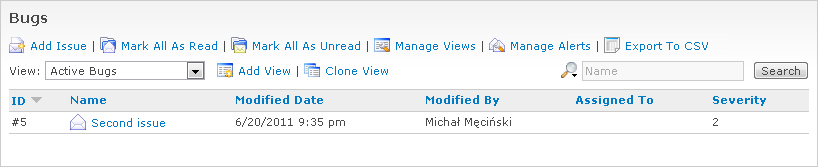
Select the “Active Bugs” view from the list. Note that now the list of issues contains only the second issue, since you have just changed the status of the first issue to Resolved.
Select other available views, to see that every time different issues are displayed and the layout of visible columns changes. This allows each user to focus only on those issues that are currently interesting — for example, a tester can view the list of fixed bugs, that need to be verified, and a developer can display the list of bugs assigned to him that must be solved.
If there are many different projects and folders in the system, finding the information that you need may be even more difficult. The global lists may be helpful in this case. You can display all issues of a particular type by selecting the global list from the “All Projects” item in the project tree. You can use sorting, searching and views in the global lists exactly the same way as in a folder. For example, you can display all active bugs from all projects and folders. You can also perform all operations on issues exactly like when viewing a folder. The global lists include an additional Location column, which displays the name of the project and folder where each issue is located. The global list of issues also makes it possible to quickly filter issues by project. Use the drop down list on the right, next to the search field, to display issues only from the selected project.
Sometimes it is not enough to use the existing public views. In that case, you can create your own, personal views, which may have any filtering criteria, columns and sorting order.
Click Add View to quickly create a new view for the current type of issues. Suppose you want to display only critical bugs, so we will call our view “Critical bugs”. The Severity column is not needed, because it will always have a value of 1, so uncheck it on the list of columns. Add the Created By and Created Date columns, so that you know who and when created the issue. To move the Assigned To and Status columns to the end of the list, set the values defining their order to 10 and 11, respectively.
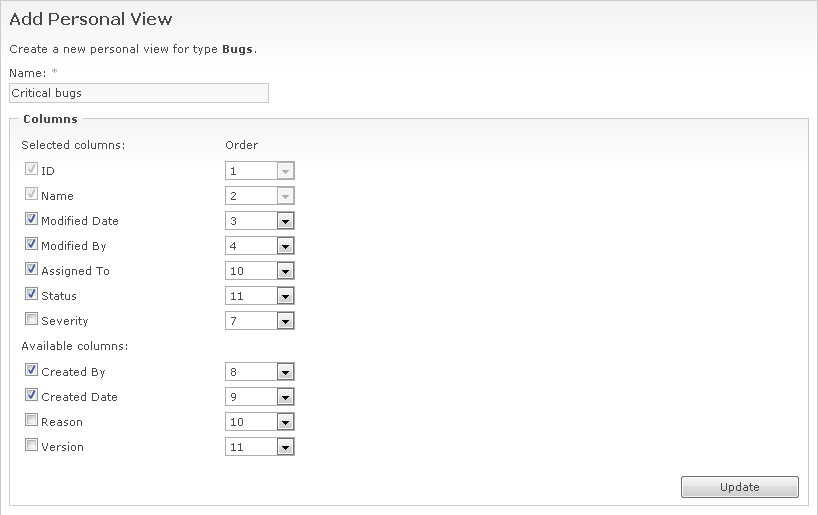
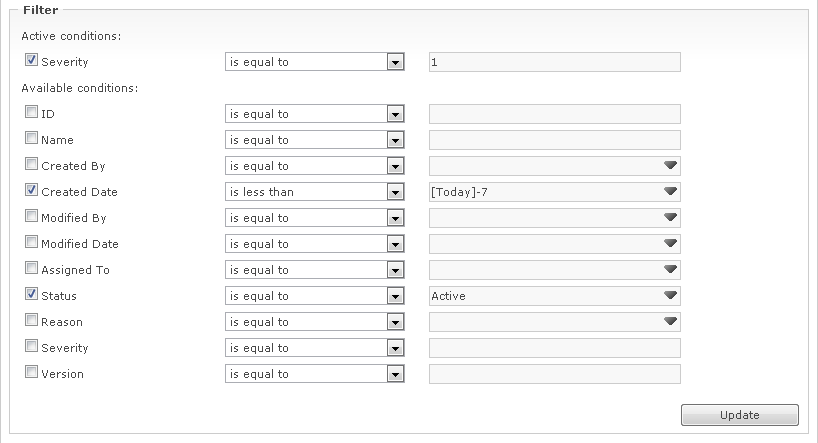
Click the button to see how the new column layout of the view will look. Leave the default sort order to display issues from oldest to newest. Then proceed to editing the filters. Enable the filter for the Severity column and type 1 as the parameter of the condition:

Save your changes by clicking . The Views drop-down list now includes a personal view named “Critical bugs”. After selecting it, the list of issues will only contain the first the issue, according to the selected filter criteria.
Different filtering operators are available depending on the type of the column. For all types the “is equal to” and “is not equal to” operators are available. These operators can also compare the value of the column with the blank value. For text columns, drop-down lists, and user names, you can also search for a fragment of text using operators “begins with”, “contains” and “ends with”. You can also create criteria that can be fulfilled by a number of different values, using the “in list” operator and entering the individual values separated by commas. In case of numbers and dates, you can use comparison operators — “is less than”, “is less than or equal to”, etc.
Now suppose that we are only interested in these critical issues, which are active and in addition older than 7 days. Such view would be very useful for people supervising the process of resolving bugs. Click Edit View to edit the active view (first make sure that it's selected).
Select two additional conditions for the Created Date and Status columns. In the first condition, select the “is less than” operator, and using the drop-down calendar, select Today. Then change the value of the parameter to “[Today]-7”. This value will be replaced by the current date minus 7 days, so only issues created more than 7 days ago will satisfy this condition. Also set the filter parameter for the Status field to Active.
Tip
Two special values can be used in the definition of a filter. The value “[Today]” is replaced by the current date (with the possibility of adding or subtracting a specified number of days), and the value “[Me]” is replaced by the name of the current user.
Click to see all the filters. Note that you can add new conditions containing those fields that are already used. Thanks to this you can create complex filters, such as “older than seven days but not older than a month”.
Save your changes by clicking . Of course the list of issues will now be empty, since at this time there are no issues older than 7 days in the system.
You can also create a new view based on an existing one. To do this, select the view you want to clone and use the Clone View command. By default the column settings and filtering criteria of the cloned view will be displayed. Customize them according to your needs and click to create a new view. This way you can also create personal views based on existing public views.
You can create any number of personal views. They won't be visible to any other user. However they will be available for each folder that contains issues of the same type. To create, modify, rename, and delete your views, open the folder of the given type, and click Manage Views. A new window will be opened containing a list of all your views with detailed information.
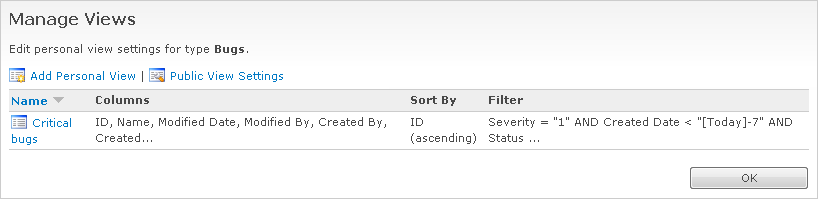
If you are a system administrator, you can also publish your views, so that they become accessible to all users, and manage public views for different types of issues. For more information, please read the section called “View settings”.