
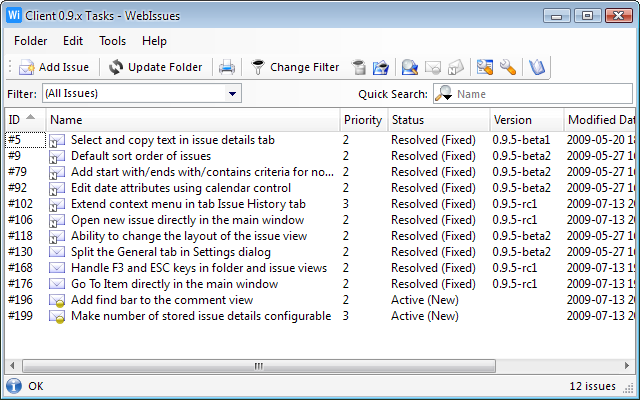
The Folder Window shows a list of issues contained in a given folder. It can be opened by double clicking a folder in the Main Window. It allows to find issues, view their details and to create new issues.
When the new three-pane layout of the Main Window is used, the Folder Window is embedded into the top right pane when a folder is selected in the Tree View or in the Dashboard. When the folder pane is activated with a mouse click or using keyboard, its commands are merged into the menus and the tool bar of the Main Window.
The main part of the Folder Window is a list of issues. For each issue the identifier and name is displayed along with a configurable set of system and user defined attributes. The Column Settings dialog can be used to select the displayed columns. You can open the details of an issue in a new Issue Window by double clicking the issue in the list. Right clicking in the list opens a context menu containing available options.
The list of issues is automatically updated when you open the Folder Window and when a change is detected after a periodic update. You can also force updating the list manually by selecting → . The contents of the list is cached so the entire list doesn't have to be downloaded every time, but only the changes made since the last update.
You can change the Filter Settings to display only issues matching specific criteria. You can also search issues by name using the Quick Search option. By default, issues are sorted by identifier, i.e. in the same order in which they were created. You can sort the list by any column by clicking on the header of that column. You can change the default sort order for all folders of the given type using the Column Settings dialog. When you hold the mouse pointer above an issue for a short time, a tool tip is displayed containing the values of all attributes of that issue.
If the folder has active watches (see Folder Watches), new and modified issues are marked with a small dot icon. Green dot indicates that the issue was modified since last opening. Yellow dot shows that the issue has never been opened since watching was enabled. When you open an issue, the dot will disappear indicating that the issue is read (i.e. neither new nor modified). You can also manually change the state of the selected issue or all displayed issues to read or new. Note that the state of issues is only tracked if there is at least one active watch for the folder.
Issues for which notifications are enabled (see Email Notifications) are marked with a small white letter 'N' on black background. It indicates that an email notification will be sent whenever an issue is modified by anyone. Note that email notifications are not available on all servers.
- (Ctrl+N)
-
Add a new issue to the folder and open it in a new Issue Window.
- (Ctrl+O)
-
Open the selected issue in a new Issue Window.
- (F5)
-
Update the list of issues in the folder.
- (Ctrl+P)
-
Print the report containing a list of issues in the folder.
-
-
Export the list of issues as a file in CSV format.
-
Save the report as a document in HTML format.
-
Save the report as a document in PDF format.
- (Ctrl+W)
-
Close the Folder Window.
- (Ctrl+F)
-
Change the current Filter Settings.
-
Save the current filter to the list of predefined filters for all folders of the same type as the current one.
-
Open the Manage Filters dialog allowing to create, rename, delete and modify existing filters.
-
Open the Folder Watches dialog allowing to select active watches for the current folder.
-
Change the state of the selected issue to read or new.
-
Change the state of all currently displayed issues in the list to read or new.
-
Enable or disable email notifications for the selected issue.
-
Enable or disable automatic notifications for all issues that you modify in the current folder.
-
Change the Column Settings for all folders of the same type as the current one.
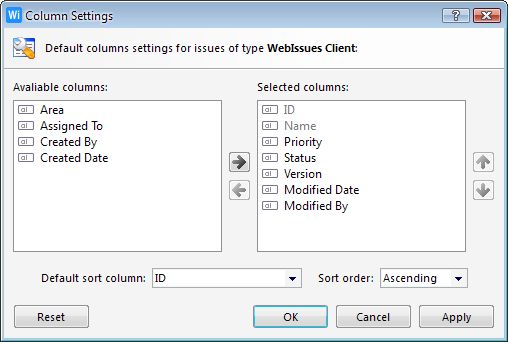
The Filter Settings dialog allows to select columns displayed in the list of issues from all available system and user defined attributes. Each type of issue has its own column settings. The dialog can be opened by selecting the → option from the menu or by right clicking on a list header and selecting .
The list on the left contains the available columns and the list on the right contains the currently selected columns. You can add the selected column using the button with arrow pointing to the right. New columns are added below the currently selected column in the list on the right. You can remove the selected column using the button with arrow pointing to the left. You can also double click a column to quickly add it or remove it from the list.
To move the selected column to a different position, use the buttons with arrows pointing up and down. You cannot remove the ID and Name columns, but you can change their position.
The drop-down lists allow to select the column by which the list should be sorted by default and the sorting order (ascending or descending). By default all lists are sorted by issue identifier.
The button restores the default list of columns, which consist of the ID, Name, Modified Date and Modified By columns.
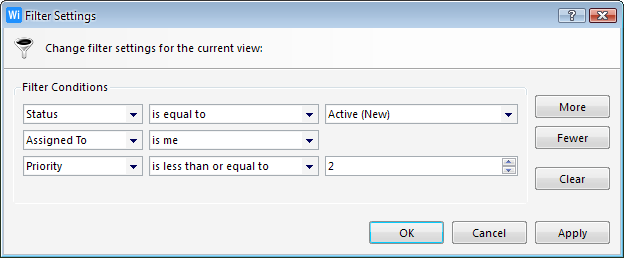
To change the Filter Settings of the list of issues, select → . When a filter is configured, only issues matching the filter criteria are displayed in the list. You can use the filter for example to display only issues with a given status, with highest priority or assigned to you. The number of displayed issues and the total number of issues in the folder is displayed in the bottom right corner of the Folder Window.
The filter may consist of a number of conditions which are joined using the logical AND operator. It means that an issue must match all criteria in order to be displayed in the list. You can increase and decrease the number of conditions using the and buttons. You can remove all conditions using the button.
Each condition consists of a system or used defined attribute, an operator and an optional operand. The attribute and operator can be selected using drop-down lists. The available operators depend on the type of the attribute. The value of the operand can be entered using various widgets depending on the type of the attribute and the selected operator.
Frequently used filters can be saved for quick access. Each type of issue has its own list of saved filters. A saved filter can be selected using the dropdown list in the left part of the filter bar. By default each issue type has two predefined filters: Created by Me and Modified in Last 24 Hours. To create a new saved filter, define the criteria using the Filter Settings dialog and select → . You will be prompted to enter the name of the filter. You can also overwrite an existing filter.
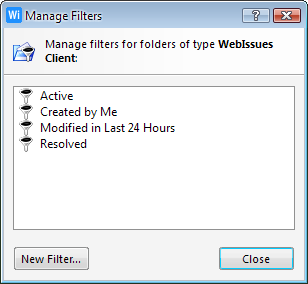
To manage the predefined filters for all folders containing issues of the same type, select → . The window shows a list of all currently defined filters and allows to create new filters and to rename, modify and delete existing filters.
To create a new filter, click and use the Filter Settings to define the conditions for the filter. Click , enter the name of the filter and click again. You will be warned if you are overwriting an existing filter.
To modify the conditions of an existing filter, double click on it or right click and select from the context menu. To rename a filter, select from the context menu and enter the new name. You will be warned if the operation overwrites an existing filter. To delete a filter, select the option.
Tip
Predefined filters are stored on the client machine, not on the WebIssues server. If you want to share filters, folder watches and column settings between a group of users, use the → → option from the Main Window to export all local settings to a file. Then use the → → option to import the settings file on a different computer or for a different user.
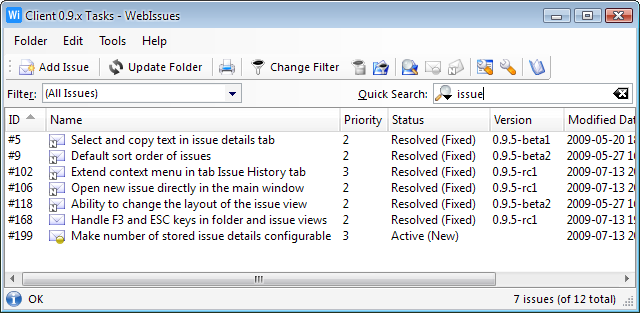
The edit box in the right part of the filter bar allows to find a word or phrase in the name of the issues or in any other column. When some text is typed in that box, the list is automatically filtered to display only matching issues. The button to the right of the edit box allows to clear the filter and display all issues. The column used for filtering can be changed using the drop-down button to the left.
Tip
You can use the F3 key to quickly activate the Quick Search box. When active, press Enter to confirm or Esc to cancel filtering.
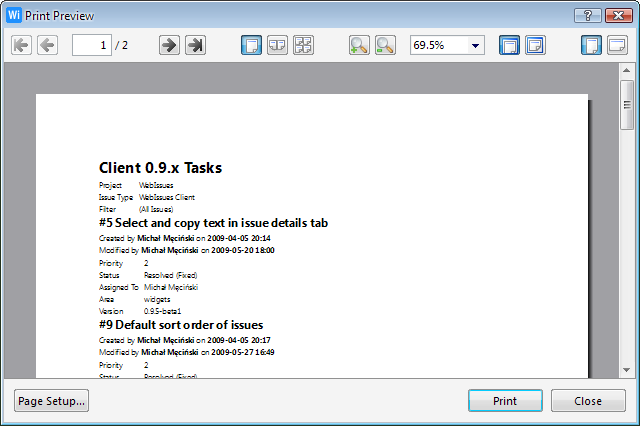
You can generate reports containing the issues in the current folder in two modes. Table reports display all issues in a single table with either currently visible columns (as they are displayed in the list) or with all system and user defined columns. Summary reports display basic information about each issue, including current values of all their attributes. The selected filter and search criteria affect the report, so only currently visible issues are included.
The report can be either directly printed or exported as a document in HTML format or PDF format. This allows to easily publish the report on a website, email it, or store it for printing later. When printing the report, you can select the printer to use and configure various options like paper size and page orientation. You can also display a preview of the report before printing it. When exporting, you just have to select the name and the location of the document.
To open the preview of the report, select in the Print dialog. Using the buttons in the top part of the window you can navigate between pages and switch the view between single page, facing pages or all pages. You can also zoom the view in and out or adjust the zoom to page width or page size. Finally you can quickly change page orientation between portrait and landscape modes. To navigate between pages, you can also drag them using left mouse button or the mouse wheel. The option allows to change paper size and page margins or select another printer.
You can also export the list of issues as a plain text data file in CSV format. Such file can be opened and edited using any spreadsheet application, such as Microsoft Excel or Calc from OpenOffice.org. The data can also be imported into a third party application, database, etc. The exported file contains all currently visible issues (depending on filter and search settings) and either columns displayed in the current view or all system and user defined columns.
Tip
Depending on current regional settings, Excel may sometimes incorrectly load the CSV file so that all fields are displayed in a single column. In that case select that column, select the option from the menu and use the delimited mode with comma as delimiter. If national characters are displayed incorrectly, you may need to open Excel, import the CSV file as a text file, select UTF-8 encoding and select comma as delimiter. Similar conversion may be needed for other spreadsheet applications.
Copyright © 2007-2009 WebIssues Team