
The Main Window of the WebIssues Client allows to connect to a WebIssues server. When the client is not connected, the window contains the Start Page which allows to reopen a recent connection or create a new connection. After opening a connection, the Main Window allows to work with projects, folders and issues and to access other windows. When the client is connected to a server, the name of the server appears in the title bar of the Main Window. Select → to display more information about the current connection.
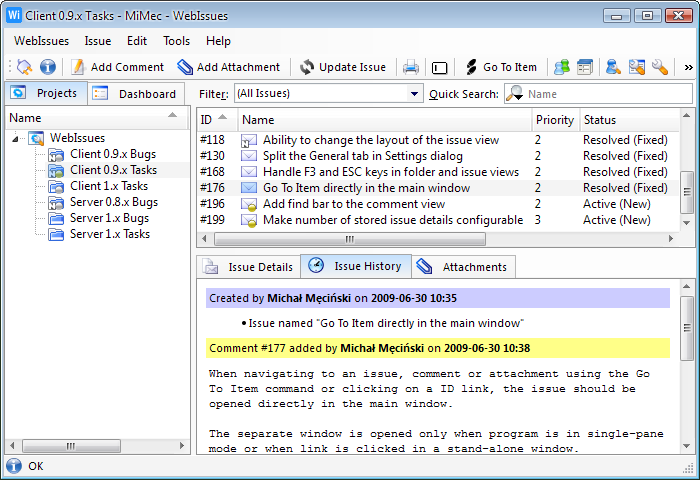
Since version 0.9.5, the Main Window uses a three-pane layout by default. The Projects Tree and Dashboard views are displayed in the left pane. The Folder Window, showing the list of issues in the selected folder, is embedded in the top right pane. The Issue Window, showing the details of the selected issue, is embedded in the bottom right pane. This layout resembles many e-mail clients and allows to work with WebIssues using a single window. Commands of the folder and issue windows are merged into the Main Window's menus and tool bar when the respective pane is activated with a mouse click or using keyboard.
In the old style single-pane layout, the Main Window shows only the Projects Tree and the Dashboard; separate windows are used to display information like folder contents or issue details. You can open multiple windows at the same time, switch between them and close them when you no longer need them. If a particular window already exists it is not opened again, but instead the existing window is activated. Some common commands like → or → are available in every window.
Note that even when the three-pane layout is used, you can still open selected folders and issues in separate windows by double clicking on the folder in the tree or the issue in the list. Also some windows, for example the Users Window or the Types Window, are always opened separately from the Main Window.
Tip
Whether the single-pane or three-pane layout is used, closing the Main Window causes the application to automatically close all other windows and quit. However, if the Tray Icon is enabled, closing the Main Window hides it, leaving the application running and all other windows opened. Clicking on the tray icon opens the Main Window again.
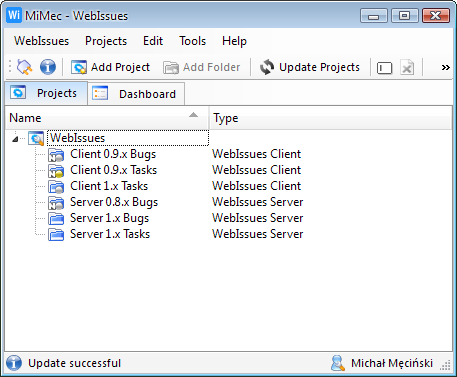
The main part of the Main Window is a tree view of available projects and folders. In addition the type of issues in each folder is displayed. You can expand and collapse individual projects by clicking the icon with a plus or minus symbol. Selecting a folder displays its content in the top right pane (unless the single-pane interface was selected). You can open a folder in a new Folder Window by double clicking the folder in the tree. Right clicking on a project or folder opens a context menu containing available options.
The tree is periodically updated to synchronize with changes made by other users. You can configure the interval of periodic updates in the WebIssues Settings. The tree is automatically updated after each change you make. You can also manually force updating the tree using the → option. The status bar at the bottom of the window shows the status of the update.
Options for creating, renaming and deleting projects are only available for server administrators. The names of projects have to be unique. Projects which contain folders cannot be deleted.
Options for creating, renaming and deleting folders are only available for administrators of the project to which the folders belong and for server administrators. The names of folders have to be unique within each projects, but may be duplicated between different projects. When a folder is created, the type of issues it will contain has to be selected; it cannot be changed later. Folders which contain issues cannot be deleted.
Folders which have active watches (see Folder Watches) are marked with a small colored dot icon in the tree view. Gray dot indicates that there are no new or modified issues in the folder. Green dot indicates that there are modified issues and yellow dot shows that there are new issues in the folder which match at least one of the watch criteria.
Folders for which notifications are enabled (see Email Notifications) are marked with a small white letter 'N' on black background. It indicates that an email notification will be sent whenever an issue is added to this folder. Note that email notifications are not available on all servers.
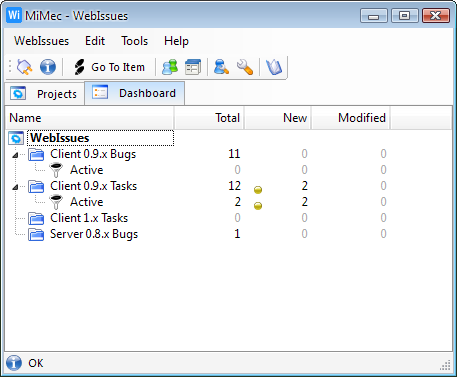
The second tab of the Main Window contains the Dashboard View. It displays summary information for all active folder watches (see the Folder Watches dialog below for more information).
For each watch, the dashboard shows the total number of issues matching the watch filtering criteria, the number of new issues and the number of modified issues. New issues are marked with a yellow dot and modified issues are marked with a green dot. This way you can easily see when someone adds or modifies issues that you're interested in - for example bugs which are active and assigned to you. Selecting a watch display the content of the folder in the top right pane, with appropriate filter selected (unless the single-pane interface is used). Double clicking a watch opens a new Folder Window.
-
Show the Login Dialog which allows to connect to a server.
-
Disconnect from the server, closing all opened windows except the main window.
-
-
Import all column settings, filters and watches from an existing configuration file.
-
Export all current column settings, filters and watches to a file.
-
Show the URL, name and version of the server, encryption details and certificate (if secure connection is used) and information about the user.
- (Ctrl+Q)
-
Quit the WebIssues Client application.
-
Create a new project on the server.
- (Ctrl+N)
-
Create a new folder in the selected project.
- (Ctrl+O)
-
Open the selected folder in a new Folder Window.
- (F5)
-
Update the projects and folders.
- (F2)
-
Rename the selected project or folder.
- (Del)
-
Delete the selected project of folder.
-
Show the members of the selected project in a new Members Window.
-
Show the Folder Watches dialog allowing to select active watches for a selected folder.
-
Enable or disable email notifications when new issues are added to the selected folder.
- (Ctrl+F)
-
Show the Find Dialog allowing to find an issue, comment or attachment by identifier.
-
Open the Users Window.
-
Open the Types Window.
-
Change your password used to login to the WebIssues server.
-
Modify your User Preferences.
-
Modify the WebIssues Settings.
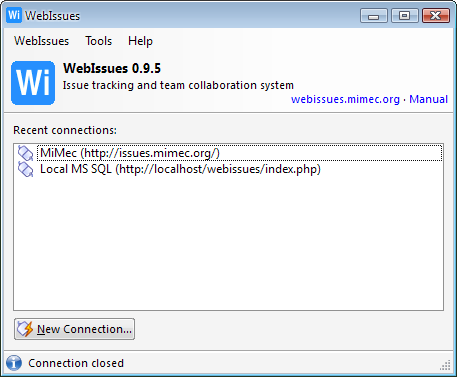
The program automatically remembers up to 20 recent connections; a separate entry is created for each server instance and login name. You can quickly open a connection by double clicking it. The Login Dialog will appear prompting you for the password unless you select the Remember password option. You can change the URL, login and password of an existing connection or delete a connection by right clicking on it and selecting an option from the context menu.
You can create a new connection by selecting → or clicking the in the bottom part of the window. The Login Dialog will appear prompting you for the URL, login and password.
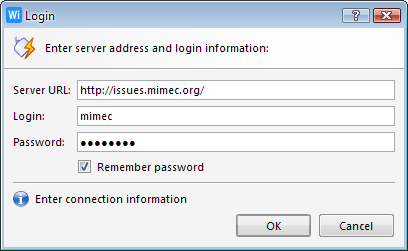
To open the Login Dialog, select → or right click on a recent connection and select . Enter the URL address of the WebIssues server, including the protocol, i.e. the http:// prefix for a regular connection or https:// prefix if a secure, encrypted connection should be used. Also enter the login and password identifying the user account on the server.
When a secure connection is used, the server certificate will be automatically verified. If the certificate is invalid, you will be prompted to review the list of errors and the information about the certificate. You can then choose to ignore the errors or abort the connection. You can select the option to prevent displaying these errors again.
You can select → to check if the current connection is encrypted and view the certificate. Note that using secure connections may not be supported by some servers and on some client platforms.
Each successful login is remembered in the list of recent connections. If you select the Remember password option, the password will also be remembered so you don't have to type it again at each login. Note that storing the password is not entirely secure, so use this option with caution.
Note
If the server requires HTTP authentication, you can pass the user name and password as part of the URL, for example http://user:password@example.com/. Basic, NTLM and Digest authentication methods are supported. HTTP authentication is completely independent from WebIssues login and password. Note that the user name and password will be visble in the list of recent connections and in the Connection Details window.
After filling the required fields and pressing the button, the application will connect to the server and authenticate the user. This may take a few seconds. During that time the fields are disabled and an button appears allowing to break the operation if the server takes too long to respond. When login is successful, the dialog is automatically closed and all necessary information is downloaded from the server.
If the connection fails for some reason, the dialog remains open and a status message appears at the bottom. The most common reasons of failure are:
-
Connection failed -
The host name is incorrect or the connection couldn't be established.
-
Server error (404 Not Found) -
The URL is incorrect and doesn't exist on the server.
-
Not a WebIssues server -
The URL is correct, but it doesn't point to a valid WebIssues server.
-
Command could not be executed (302 Incorrect Login) -
The login or password is incorrect or the user account was disabled.
Tip
There is one predefined user account called admin with initial password entered during the installation of the server. System administrators can create user accounts for other users.
Folder watches are used to track new issues and modifications to existing issues that match given filtering criteria. You can configure watches for each folder separately by selecting a folder and selecting the → option. When a folder has at least one active watch, its content is periodically updated in the background so that changes can be detected and displayed in the Dashboard View. In addition, the state of all issues in such folder are tracked. New issues (i.e. issues which have never been opened since watching had been enabled) are marked with small yellow dots and modified issues (i.e. issues which have been modified by other users since last opening) are marked with green dots.
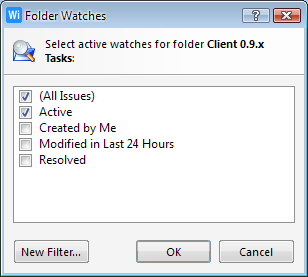
The Folder Watches dialog allows to select active watches for the selected folder. Each watch is associated with filtering criteria, so the list of available watches is the same as the list of predefined filters for a particular type of issues. There is also an item named (All Issues) which allows to watch all issues in the selected folder. Select or deselect the check boxes in the list to activate and deactivate watches.
To create a new filter, click and use the Filter Settings dialog to define the conditions for the filter. Click , enter the name of the filter and click again. The filter will be available for all folders containing the same type of issues as the selected folder.
Email notifications is an optional feature of WebIssues which is not available until it is enabled on the server. Emails can be sent automatically when issues are added to selected folders and when selected issues are modified. Unlike folder watches, email notifications don't require the client to be running, because they are handled on the server. However, filtering is not available on the server, so it's not possible to automatically send notifications for issues matching some criteria (for example, active bugs assigned to you); instead you have to select the individual folders and issues for which notifications are sent.
To enable notifications for all issues added to a folder, select the folder in the projects tree and select the → option. The folder is then marked with a small white letter 'N' on black background, meaning that it's subscribed for notifications. Similarly, to enable notifications when an issue is modified, select the issue in the Folder Window and select the → option. Subscribed issues are marked with a similar symbol.
If automatic notifications are enabled for a folder, notifications are automatically enabled for all issues that you modify (by changing an attribute, adding a comment or attaching a file). To enable automatic notifications, use the → option in the Folder Window.
In order for email notifications to work, you have to enter a valid email address using the User Preferences window and select the frequency of notifications.
The Find Dialog allows to quickly open an issue by entering its identifier. It can also be used to locate a comment or attachment with the given identifier. The dialog can be opened by selecting → from the Main Window's menu or the Tray Icon's context menu.
If the item is found, it is highlighted in the folder list and its details are displayed in the bottom right pane of the Main Window. In single-pane mode, an Issue Window is opened. If the item is a comment or an attachment, its position in the issue history is automatically located. If the item doesn't exist or is not accessible to the user, an error message is displayed saying that no item with the given identifier was found.
Tip
Identifiers in WebIssues are always prefixed with the # (hash) character. They appear in the list of issues and attachments and in the history of the issue. They can also be placed in comments and attribute values for referring to other items (see Smart Links).
The settings dialog can be opened by selecting → from any window's menu. It can be used to change some global settings of the WebIssues Client.
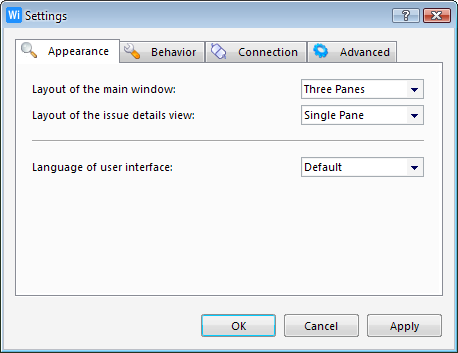
- Layout of the main window
-
Switch the layout of the Main Window to the traditional single-pane or the new three-pane mode.
- Layout of the issue details view
-
Switch the layout of the Issue Window to single-pane or two-pane mode, split horizontally or vertically.
- Language of user interface
-
You can use this option to select the language used by the program. By default the language is selected automatically based on the language settings of the operating system. You have to restart the application for the language change to take effect.
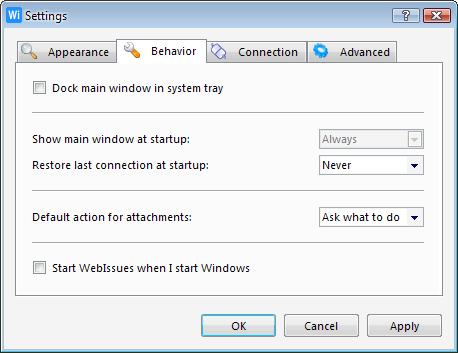
- Dock main window in system tray
-
Enable or disable the Tray Icon.
- Show main window at startup
-
Make the main window initially visible, hidden or restore the previous state when the program was closed. This option is only available if docking is enabled.
- Restore last connection at startup
-
When the WebIssues Client is started, always connect to the previous server, remain disconnected or restore the connection only if it was active when the program was closed.
Tip
If you enable this option, it may be useful to also enable the Remember password option in the Login Dialog. This way you won't have to enter your password every time the WebIssues Client is started.
- Default action for attachments
-
By default when you double click an attachment, a message box is displayed asking if you want to save the attachment or open it directly in the default application. You can change this option to always perform the selected action automatically. If you do this, you can still use the context menu to select another action.
- Start WebIssues when I start Windows
-
On Windows only: automatically start the WebIssues Client after logging to Windows.
Tip
This option is not available on Linux. Instead, if you leave the WebIssues Client running when you end your session, it will be automatically restarted the next time you log in. This feature is especially useful in connection with the Tray Icon because it makes the application always available with a single mouse click.

- Proxy used for Internet connections
-
Type of proxy used for connecting to the server. Supported types are HTTP and SOCKS5 proxies.
- Host name, Port number
-
Name of the proxy server and the port number. These fields are required when a proxy is selected.
- User, Password
-
User name and password needed if the proxy requires authentication. Basic, NTLM and Digest authentication methods are supported for HTTP proxies and simple authentication is supported for SOCKS5 proxies.
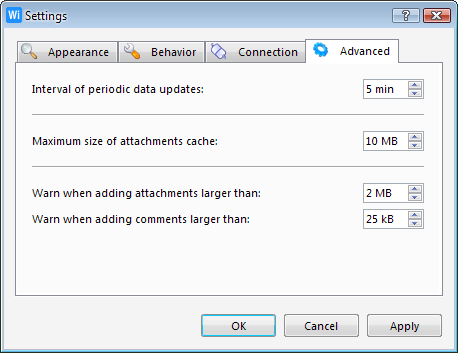
- Interval of periodic updates
-
The interval in minutes between periodic updates of the projects, users and issue types which synchronize the client with changes made on the server by other users.
- Maximum size of attachments cache
-
Downloaded and opened attachments are cached on your hard disk for better performance. You can control the maximum amount of space this cache will take. Note that for each server that you connect to a separate cache is created.
- Warn when adding attachments larger than
-
A warning message is displayed when you try to upload an attachment larger than this size. Unless your server administrator has configured the server to accept larger attachments, it's recommended to leave the default value of 2 megabytes.
- Warn when adding comments larger than
-
A warning message is displayed when you try to add a comment larger than this size. Older versions of the WebIssues Server may not be able to handle large comments.
The User Preferences dialog can be opened by selecting → from the main window's menu. System administrator can also view and modify preferences of all users using the → option from the Users Window.
Note that user preferences are not available when using older versions of the WebIssues Server. Also the Notifications tab is not displayed unless the email notifications feature was enabled by the administrator of the server.
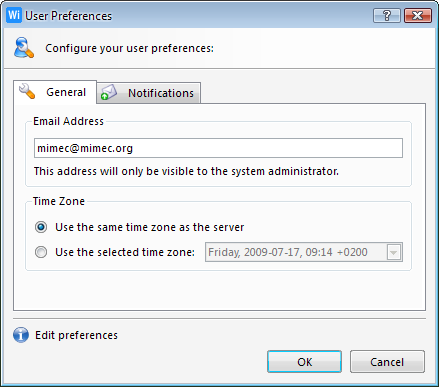
- Email Address
-
The email address of the user. Email notifications are sent to this address.
- Time Zone
-
The time zone of the user. By default it's assumed to be the same as the server's time zone. It can also be configured to the selected time zone. Note that in that case daylight saving is not automatically applied and may need to be manually adjusted.
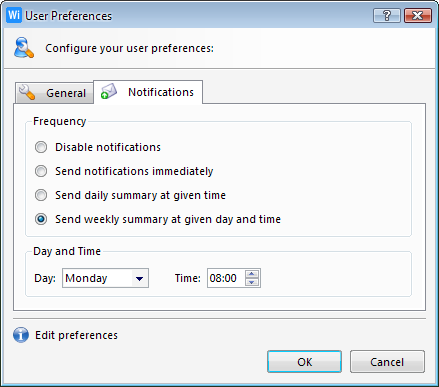
- Disable notifications
-
Emails are not sent.
- Send notifications immediately
-
Emails are sent as soon as an issue is added to a subscribed folder or a subscribed issue is modified. Note that notifications are processed periodically, not more often than a time threshold configured on the server, so it may actually take some time before the email is sent.
- Send daily summary at given time
-
Emails are sent at most once a day at the configured time (using the time zone selected on the General tab).
- Send weekly summary at given day and time
-
Emails are sent at most once a week on the selected day of the week and at the configured time.
The tray icon is not available by default. You can enable it in the WebIssues Settings. It is useful if you frequently use the WebIssues Client and want to keep it running in the background so that it's always accessible with a single mouse click.
If you click on the tray icon with the left mouse button, you can show or hide the Main Window; it is either shown if it's hidden or minimized or hidden if it's visible. You can also hide the Main Window by simply closing it. The application will keep running until you select → from the menu.
If you click on the tray icon with the right mouse button, a context menu is displayed with some commonly used options like , , and .
A small lightning appears in the bottom right corner of the icon when the WebIssues Client is connected to a server. The tool tip of the icon displays the name of the server.
If the Main Window is hidden when you quit WebIssues Client or log off from the system, the window will not appear automatically the next time you run the application but it will remain hidden.
Copyright © 2007-2009 WebIssues Team