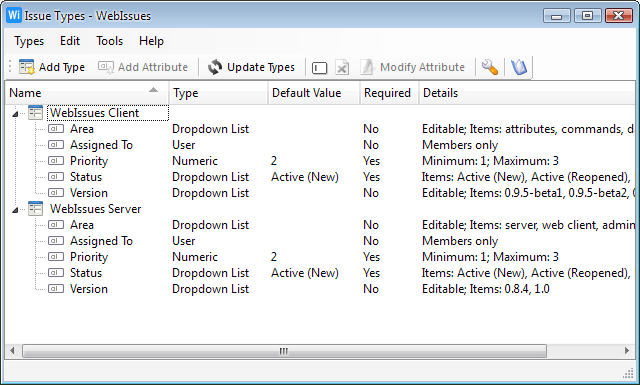
The Types Window shows all issue types defined on the server and their attributes. It allows server administrators to create new types and to modify existing ones by adding, removing and modifying attributes. To open the Types Window, go to the Main Window and select → .
When the WebIssues server is installed, it contains three predefined issue types: Bugs, Features and Tasks with some example attributes. System administrators can customize these types and create new types based on their needs and the purpose of the system. Issue types can be modified during the entire lifetime of the system, even if there are existing issues of these types.
The main part of the Types Window is a tree view of issue types and their attributes. For each attribute its type, default value and details are displayed. You can expand and collapse individual types by clicking the icon with a plus or minus symbol. You can open the Attribute Dialog by double clicking an attribute in the tree. Right clicking on a type or attribute opens a context menu containing available options.
The tree is periodically updated to synchronize with changes made by other users and after each change you make. You can also manually force updating the tree using the → option.
Options for creating, renaming and deleting types and attributes are only available for server administrators. The names of types have to be unique. The names of attributes of a single type also have to be unique, but different issue types may contains attributes with the same name. Issue types which have been assigned to folders cannot be deleted.
Warning
Deleting an attribute will irreversibly delete all its values and all historical changes of this attribute for existing issues of the particular type.
-
Create a new issue type.
- (Ctrl+N)
-
Add a new attribute to the current issue type.
-
Update the types and attributes.
- (Ctrl+W)
-
Close the Types Window.

The Attribute Dialog is used to specify the definition of a new attribute or to modify the definition of an existing attribute. You can open this dialog by double clicking an attribute or by selecting → .
The Attribute Dialog contains the following options:
- Name
-
Only when creating a new attribute: the name of the attribute.
- Type
-
The type of the attribute (see Attribute Types).
- Details
-
Additional parameters depending on the selected type.
- Attribute is required
-
If selected, the attribute cannot have an empty value.
- Default value
-
The initial value of this attribute for new issues. It must be entered if the attribute is required.
Changing the definition of an existing attribute doesn't affect its current values. Only when a value of the attribute is changed the new definition is taken into account.
If a new attribute is added to an issue type, existing issues of this type don't have any value for this attribute assigned even if a default value is specified in the definition.
The following types of attributes are available:
- Text
-
Any text with an optional length limit can be entered.
- Dropdown List
-
One of the items from the list can be selected. In editable mode, any text can be entered or one of predefined items can be selected.
- Numeric
-
An integer or fixed-point decimal fraction can be entered. Optionally a minimum and maximum value can be defined.
- Date & Time
-
A date with optional time can be specified.
- User
-
A user can be selected from a list of all users or from members of the project the issue belongs to.
Copyright © 2007-2009 WebIssues Team